Introduction
First of all, I must admit that when I started this line of articles I was very skeptical. 22-bit color from only 16-bit input? It just doesn't sound very plausible. But while researching information, it became more and more obvious that it isn't so impossible, as I thought at first. In this follow-up article I will introduce an improved filtering technique that will stop the bleeding of colors in situations where it isn't appropriate. After that, I will give a short mathematical hint about why 3dfx might claim 22-bits (and not 21 or 23). Finally, I will add some more small comments based on the various emails that I have received concerning this subject.
First of all, let me introduce the advanced filtering technique. The original article (which can be found here) described one very big disadvantage of the upsampling filter (which increases the color depth). This disadvantage causes blurring, more specifically blurring of details which resulted in a fuzzy and unsharp looking image. The goal of this advanced filter is to avoid this problem.
Before we can figure out how to improve the technique, we need to know when it is advantageous to use the filter and when it's not. When we have a smooth color gradient then we will want to use the filter since that is where dithering patterns are most visible. However, when we have a small detail in a texture or when there is a border between two objects, then we don't want the blurring. Basically, we need to modify our filter depending on the contents of the image. Now how can we find out if a pixel is part of a color gradient or part of a detail or an edge?
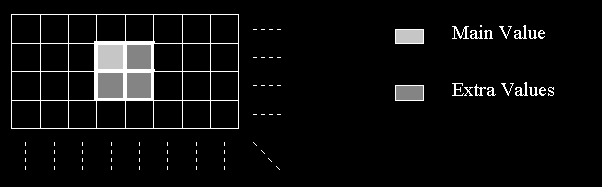
Actually this is pretty easy, as I will demonstrate with
this example. Let's assume we use a 2 by 2 filter to do the color upsampling.
This filter is very simple. If we want to find the 24-bit upsampled color
at position (x,y) then we will use the colors to the right, bottom, and
bottom right of that main position. I will call these 3 pixels the extra
pixels.
Now lets assume that we have one very small detail in our image: a white dot on a huge black background, which is at position (x,y), the main position. This means the main position has a color value of R=255 G=255 B=255. All the extra pixel's color values are black and have as color value R=0 G=0 B=0. Now if we applied the old filter, our final pixel would be grayish since it would get the color intensity of 255/4 for R, G and B. This is the fuzzy effect that we don't want! So, in this situation we don't want to filter at all.
Now lets take a second texture, a sky texture with a gradient from dark red to light red. Our main pixel has a color value of R=200 G=0 B=0, and the surrounding extra pixels have slightly different values such as R=208 G=0 B=0 or R=192 G=0 B=0. Notice the small jump from one 16-bit red value to another. In this case we do want filtering.
The clue about whether a pixel is a detail or a gradient lies in values of the surrounding pixels. In the case of a small detail, we see a huge difference between the color value of the main pixel and those of the extra pixels. In the case of a smooth gradient, however, we see only a small difference in the color values. So, all we need to do to decide whether to use the filter is use a simple comparison between the main value and the extra values!
Now our algorithm turns into this: read the four 16-bit color values that contribute to the final 24-bit result. One of these values is the main value (at the position you are calculating/filtering now) and the other values are called extra values. Before the filtering you compare the extra color values with the main color value. If the difference is huge, you throw out the extra pixels value, but if the difference is small you retain that color value. At the end you do a filter operation using those values that were retained (can be 4, 3 ,2 or only 1 color value).
This modified algorithm will blur color gradients and create extra intermediate colors, but all filtering will be stopped at edges since the edge values are thrown away by the comparison (big difference at edges and near details). By using this technique, we have successfully removed the “detail blurring†and the “fuzzy look†problems.
If you want more details then you should check out these two articles : one and two.